
Note, see OpenVibe – Part 1 and OpenVibe – Part 2
Now a walk-through (Part 3 of 3) of using your Mindwave and OpenVibe to save a sample of your brainwaves to a file.
Start “openvibe designer”, then open your “acquisition-signal-display.xml” and your “acquisition-file-csv.xml”

Start Neurosky’s “Thinkgear Connector”, and make sure the “Starting port” is correct.

Start “openvibe acquisition server”, and choose a driver “Neurosky Mindset”
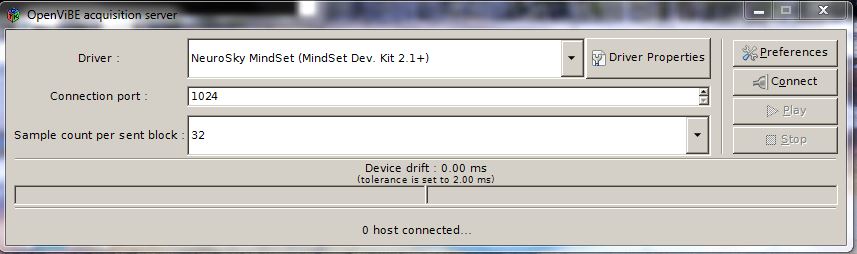
Click on “Driver Properties”, and make sure the “COM Port” is correct” and you’ll want a “Sampling frequency” of 512.

Click on “Connect”, then once it is connected, click on “Play”.

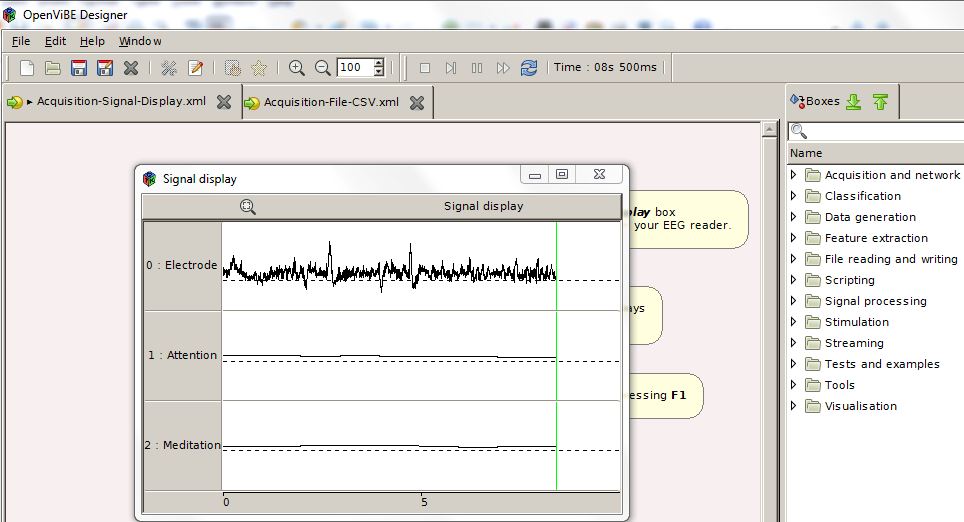
Going back to the “openvibe designer”, click on “Acquisition-Signal-Display.xml”, then click on the little arrow at the top menu, and a box with pop up showing your brainwaves! To stop, click on the little box at the top menu.
Next click on “Acquisition-File-CSV.xml”, then double-click on the “CSV File writer” to remind you that (as previously saved in Part 2) the file will be “c:/OpenVibe/hello.csv” and close the CSV File Write Settings box.

Click on the the little arrow on at the top menu and start recording your brainwaves to a file. Wait for however long you want the recording, then click on the little box at the top menu, to stop recording.
Now, I would stop OpenVibe, take off the Mindwave, and have a look at “c:/OpenVibe/hello.csv”. Using Excel, here is what the file looks like:

You’ll notice that all the information is in one column. To move the info into separate columns:
- highlight the one column with all the info
- click on “Data” in the top menu
- click on “Text to Columns”
- the column wizard pops up, choose “Delimited”, then click on Next
- checkmark semicolon (and uncheck tab), then click Next
- then click on “Finish”

You’ll notice under “Sampling Rate”, it says 512. That means there are 512 records per second , which is the standard for EEG machines. Under “Electrodes” is the raw data, and under “Attention” and “Meditation” are the numbers showing home much your brain is focused or relaxing (based on a Neurosky algorithm).

To graph one second, delete all the info after line 513, then highlight the columns, click on “Insert” and then click on “Scatter”, then choose “Scatter with Smooth Lines”

One second of your brainwaves graphed:
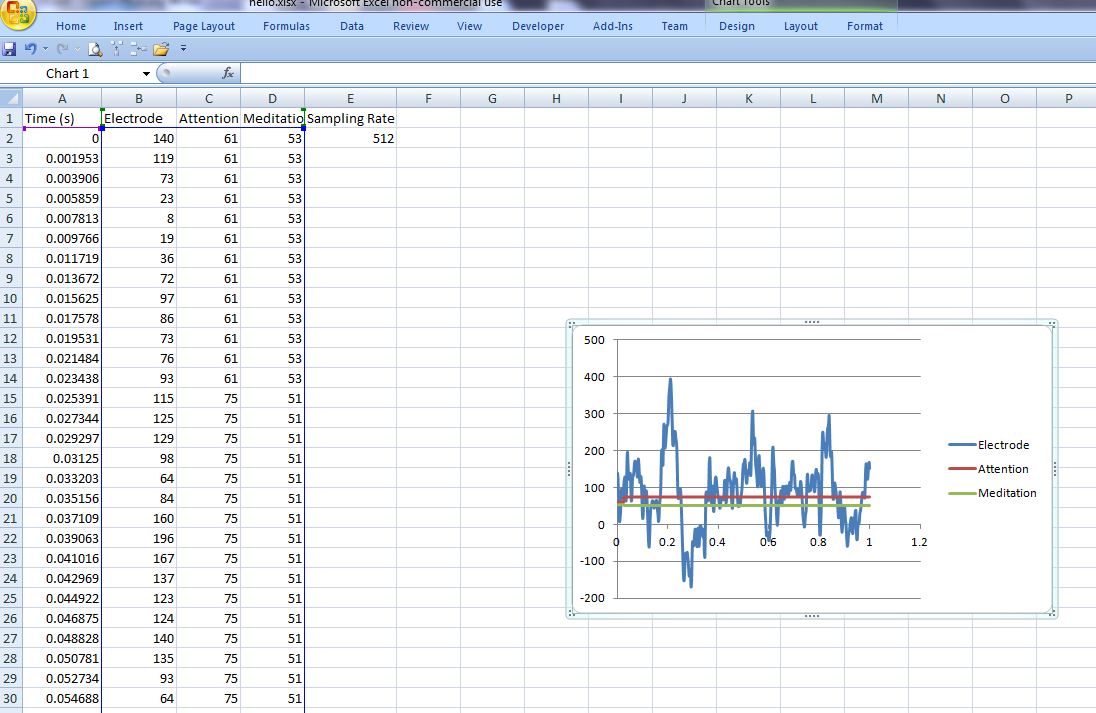
So what does this graph mean? I haven’t a clue, but it is a good first step on the journey to understanding brainwaves.

hello, i am trying to connect mindwave mobile headset with open vibe according to steps told in https://alphagammawaves.wordpress.com/2015/01/04/openvibe-part-3/
but when i open driver properties of open vibe acquisition server there is a difference that my com port box is not available to check (is disable) but as shown in the link it is checked as 3
where is the mistake ? kindly guide me
Regards
LikeLiked by 1 person
Hi kisaa
These OpenVibe instructions are for a “Mindwave”, not a “Mindwave Mobile”. Luckily there are a couple of apps that do work with a “Mindwave Mobile” to download raw brainwaves:
“eegID” – which is free
http://store.neurosky.com/products/eegid
and “Measure Brain Wave Lba Dual Sensor” – which is $7.26
http://store.neurosky.com/products/measure-brain-wave-lba-dual-sensor
Presently I don’t think OpenVibe works with the “Mindwave Mobile”,
but they’ll probably add it at some point.
http://openvibe.inria.fr/supported-hardware/
Anyway good luck! And please let me know how it goes.
Katie
LikeLike
thank you Katie, now i am working on Puzzelbox Synapse it is also a good app to save brain signals.
LikeLike
Excellent!
LikeLike
it is really good , how do we get the frequency vs amplitude ?
LikeLike
Brainwaves.io (my project) now has free, open source software to analyze the brainwave data.
http://brainwaves.io/wp/brainwave-analyzer-help/
Hope you check it out.
LikeLike
i have done as you said but finally when i open designer window
by clicking play button then openvibe stops workig
LikeLike
Hi krishna
So sorry about the large delay getting back to you!
Which operating system are you using?
These are the supported operating system:
http://openvibe.inria.fr/supported-architectures/
perhaps your operating system is not supported?
Katie
LikeLike
Hi!
I followed your instructions except when I stop recording I can’t find the CSV file. Does is save automatically or do I have to do something else?
Thank you!
LikeLiked by 1 person
Hi Alannah, sorry to take so long to reply!
Make sure you also follow the instruction in Part 2, which describes how to set where
the CSV file is saved to. And Part 1 might also be helpful.
The Openvibe software works great, but it is sooo complicated to use. I’m hoping to
provide software that will save to a CVS file but that is more user-friendly. Hopefully
it will be available later on this year.
Good luck with your endeavors,
Katie
LikeLike
Hi,
I have successfully connected to openVibe using mindwave mobile on Windows 7. But when I run “acquisition-signal-display.xml”, it returns an error “Vertical scale must be > 0”. I have checked the vertical scale in the dialog that opens on double-clicking signal display box. It is set to 100. What can be a possible solution?
LikeLike
Hi Nancy
Sorry, I wrote this up using “Mindwave”, not the “Mindwave Mobile”
so I don’t know the differences or if OpenVibe and “Mindwave Mobile”
are compatible.
Luckily there are a couple of apps that do work with a “Mindwave Mobile”
to download raw brainwaves:
“eegID” – which is free
http://store.neurosky.com/products/eegid
and “Measure Brain Wave Lba Dual Sensor” – which is $7.26
http://store.neurosky.com/products/measure-brain-wave-lba-dual-sensor
Presently I don’t think OpenVibe works with the “Mindwave Mobile”,
but they’ll probably add it at some point.
Hope this helps!
Katie
LikeLike
Hi! I am successfully connected, but error after clicking on “Play” button. Please reply for the solution
System Config:-
NeuroSky Mindwave
Windows 10
OpenVibe v1.30
LikeLiked by 1 person
Hi vsl
My understanding is that the Mindwave Headset (Not the Mindwave Mobile) only works with Windows XP, Windows Vista and Windows 7. So if you are using Windows 10 it won’t work, I would try switching to Windows 7 or XP.
For collecting readings I would also recommend the Mindwave Reader512:
http://brainwaves.io/wp/reader512-2/reader512-help/
But it too would only work with Windows 7 or XP.
Best of luck!
Katie
LikeLike